Authoring Azure Cosmos DB Stored Procedures using JavaScript
In this lab, you will author and execute multiple stored procedures within your Azure Cosmos DB instance. You will explore features unique to JavaScript stored procedures such as throwing errors for transaction rollback, logging using the JavaScript console and implementing a continuation model within a bounded execution enviornment.
Setup
Before you start this lab, you will need to create an Azure Cosmos DB database and collection that you will use throughout the lab.
Create Azure Cosmos DB Database and Collection
You will now create a database and collection within your Azure Cosmos DB account.
-
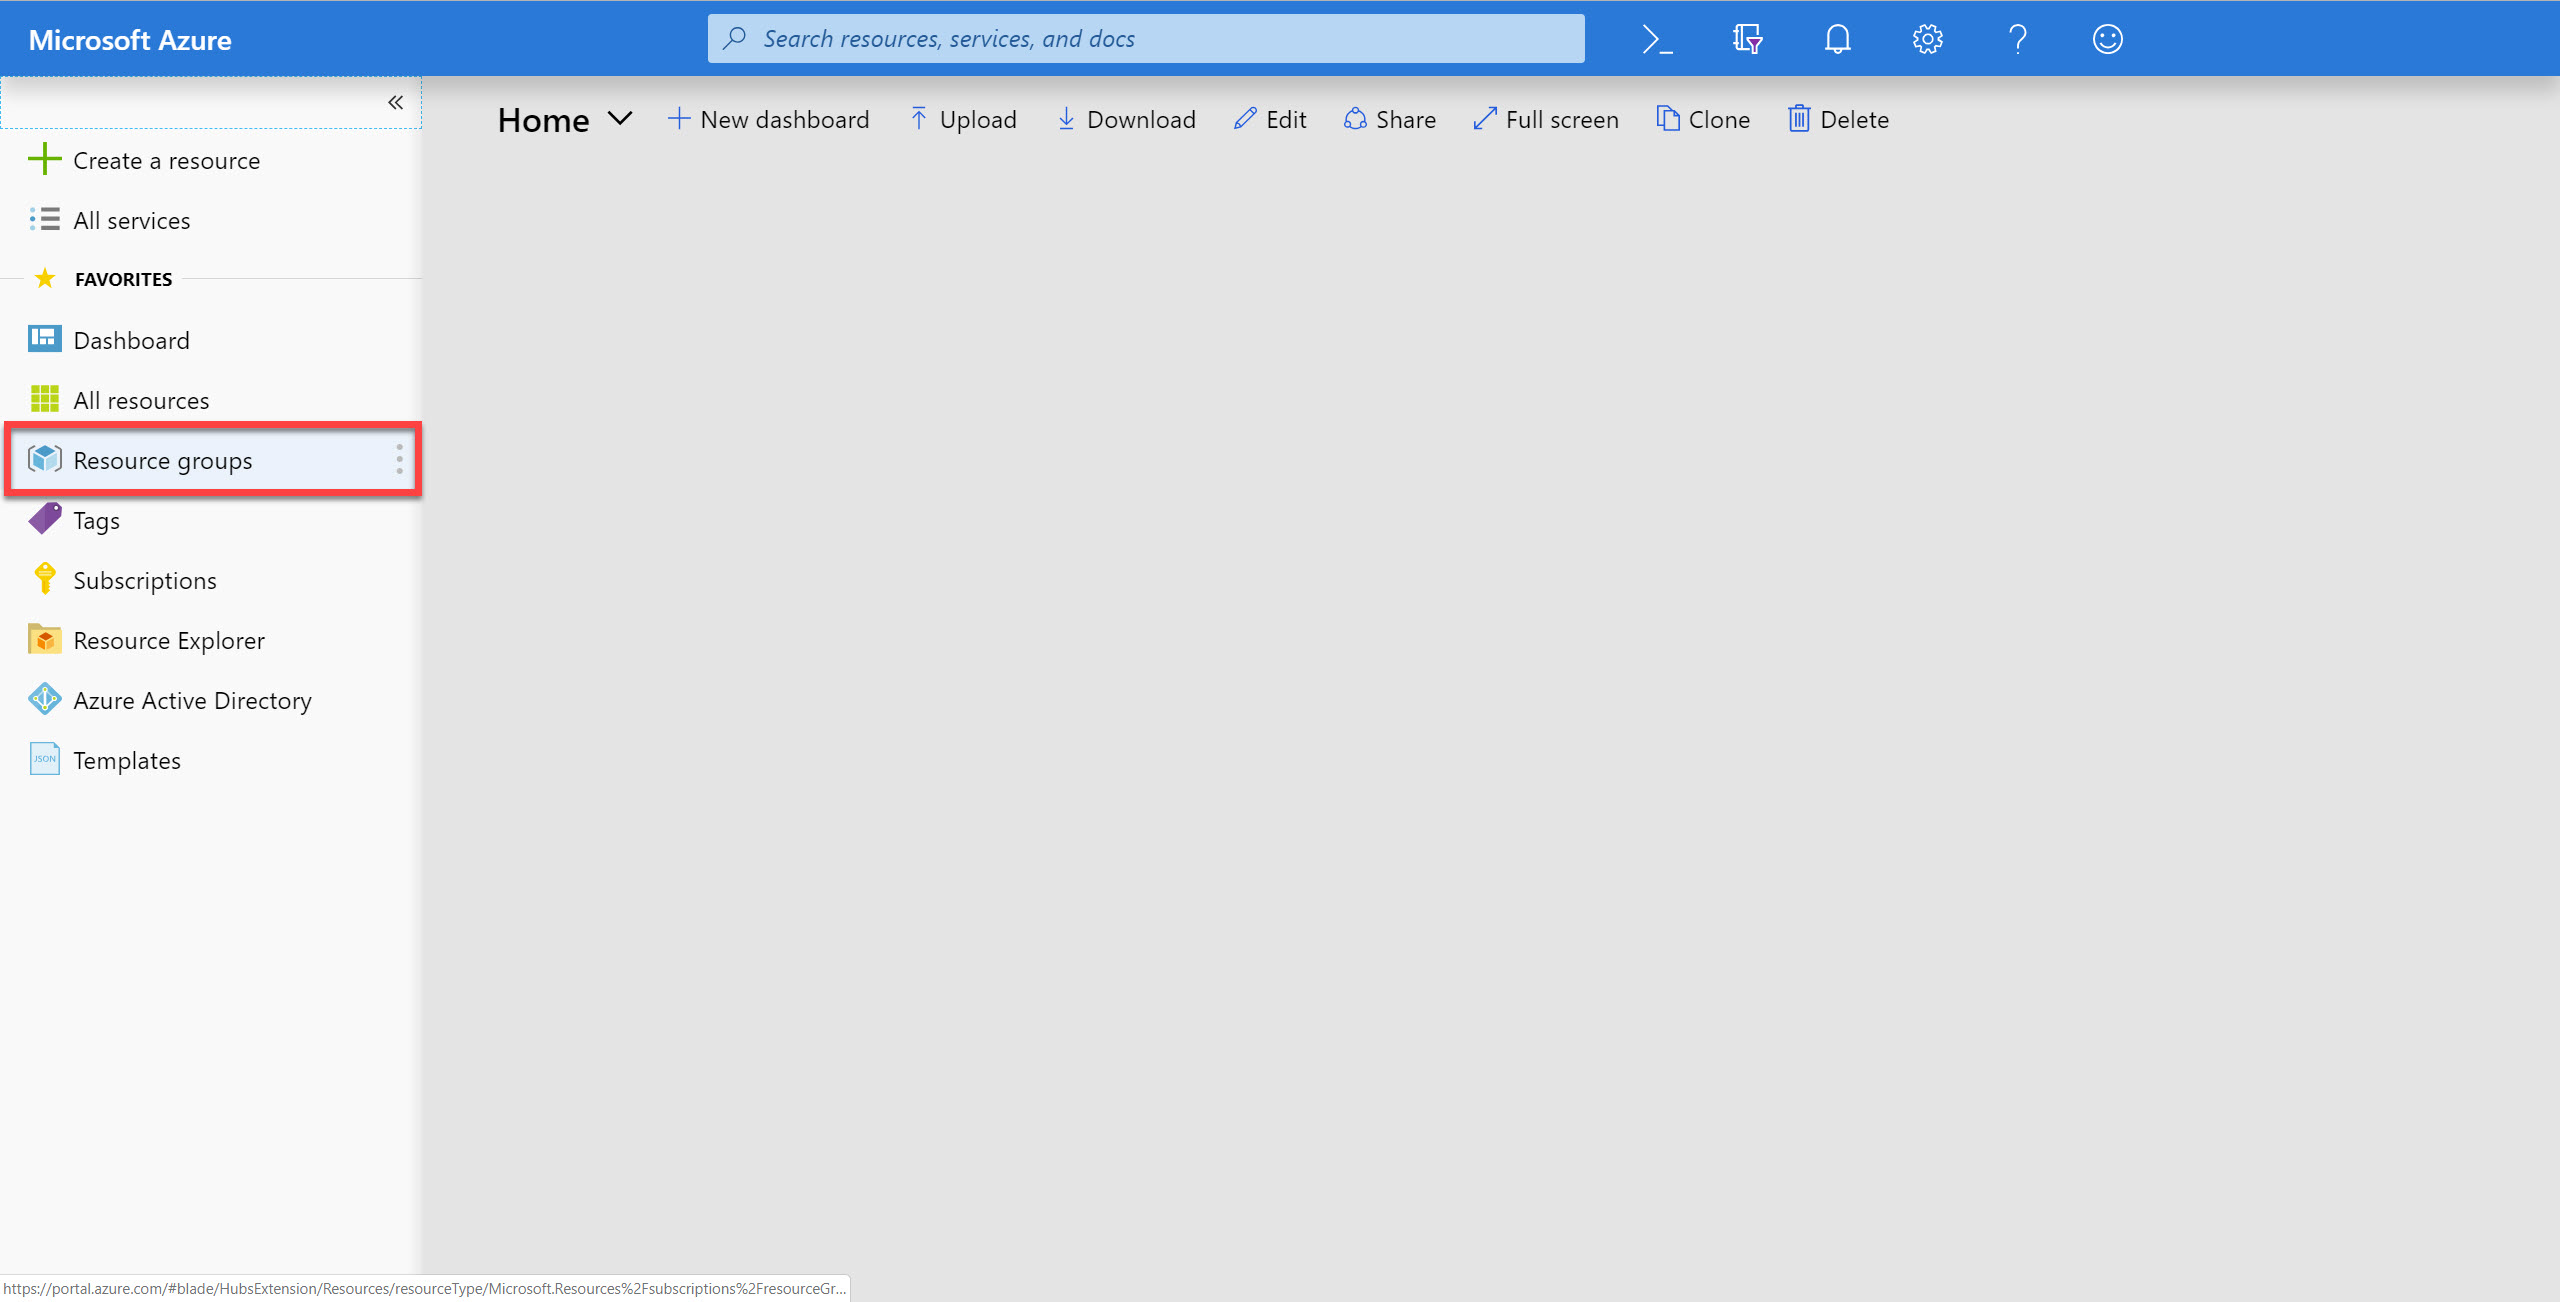
On the left side of the portal, click the Resource groups link.
-
In the Resource groups blade, locate and select the cosmosgroup-lab Resource Group.
-
In the cosmosgroup-lab blade, select the Azure Cosmos DB account you recently created.
-
In the Azure Cosmos DB blade, locate and click the Overview link on the left side of the blade.
-
At the top of the Azure Cosmos DB blade, click the Add Collection button.
-
In the Add Collection popup, perform the following actions:
-
In the Database id field, select the Create new option and enter the value FinancialDatabase.
-
Ensure the Provision database throughput option is not selected.
-
In the Collection id field, enter the value InvestorCollection.
-
In the Partition key field, enter the value
/company. -
In the Throughput field, enter the value
1000. -
Click the OK button.
-
-
Wait for the creation of the new database and collection to finish before moving on with this lab.
Retrieve Account Credentials
The Data Migration Tool and .NET SDKs both require credentials to connect to your Azure Cosmos DB account. You will collect and store these credentials for use throughout the lab.
-
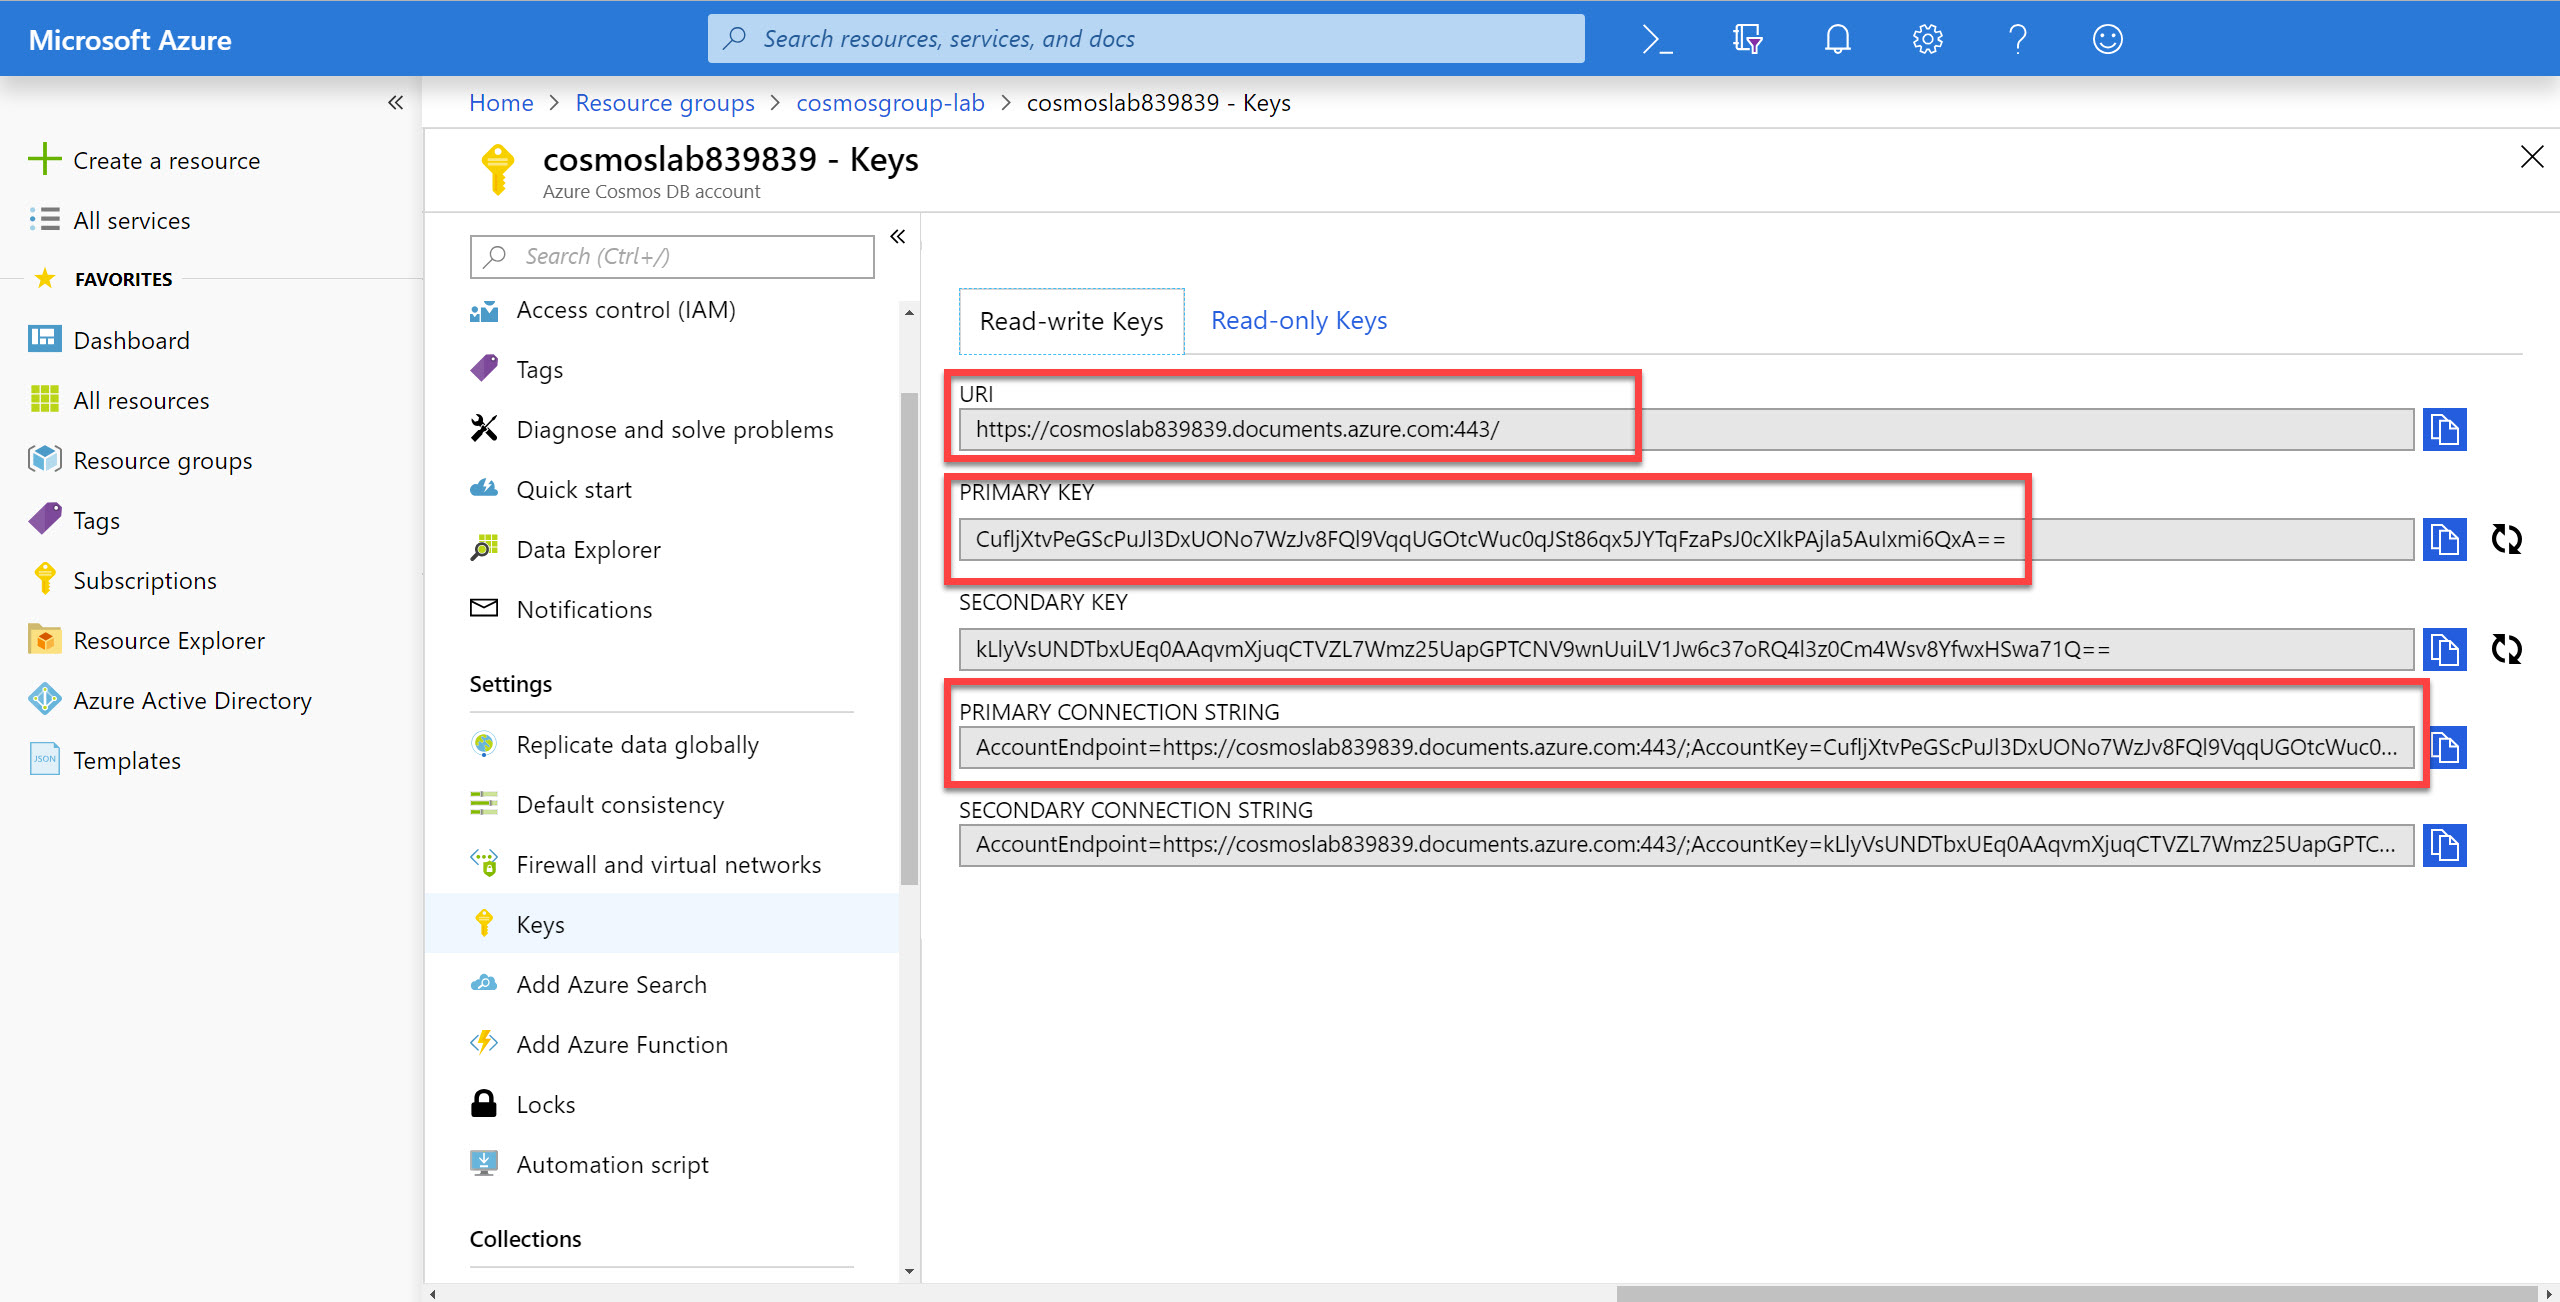
On the left side of the Azure Cosmos DB blade, locate the Settings section and click the Keys link.
-
In the Keys pane, record the values in the CONNECTION STRING, URI and PRIMARY KEY fields. You will use these values later in this lab.
Author Simple Stored Procedures
You will get started in this lab by authoring simple stored procedures that implement common server-side tasks such as adding one or more documents as part of a database transaction.
Open Data Explorer
-
In the Azure Cosmos DB blade, locate and click the Data Explorer link on the left side of the blade.
-
In the Data Explorer section, expand the FinancialDatabase database node and then expand the InvestorCollection collection node.
-
Within the InvestorCollection node, click the Documents link.
Create Simple Stored Procedure
-
Click the New Stored Procedure button at the top of the Data Explorer section.
-
In the stored procedure tab, locate the Stored Procedure Id field and enter the value: greetCaller.
-
Replace the contents of the stored procedure editor with the following JavaScript code:
 function greetCaller(name) {
     var context = getContext();
     var response = context.getResponse();
     response.setBody("Hello " + name);
 }
This simple stored procedure will echo the input parameter string with the text
Helloas a prefix. -
Click the Save button at the top of the tab.
-
Click the Execute button at the top of the tab.
-
In the Input parameters popup that appears, perform the following actions:
-
In the Partition key value field, enter the value:
example. -
Click the Add New Param button.
-
In the new field that appears, enter the value:
Person. -
Click the Execute button.
-
-
In the Result pane at the bottom of the tab, observe the results of the stored procedure’s execution.
The output should be
"Hello Person".
Create Stored Procedure with Nested Callbacks
All Azure Cosmos DB operations within a stored procedure are asynchronous and depend on JavaScript function callbacks. A callback function is a JavaScript function that is used as a parameter to another JavaScript function. In the context of Azure Cosmos DB, the callback function has two parameters, one for the error object in case the operation fails, and one for the created object.
-
Click the New Stored Procedure button at the top of the Data Explorer section.
-
In the stored procedure tab, locate the Stored Procedure Id field and enter the value: createDocument.
-
Replace the contents of the stored procedure editor with the following JavaScript code:
 function createDocument(doc) {
     var context = getContext();
     var collection = context.getCollection();
     var accepted = collection.createDocument(
         collection.getSelfLink(),
         doc,
         function (err, newDoc) {
             if (err) throw new Error('Error' + err.message);
             context.getResponse().setBody(newDoc);
         }
     );
     if (!accepted) return;
 }
Inside the JavaScript callback, users can either handle the exception or throw an error. In case a callback is not provided and there is an error, the Azure Cosmos DB runtime throws an error. This stored procedures creates a new document and uses a nested callback function to return the document as the body of the response.
-
Click the Save button at the top of the tab.
-
Click the Execute button at the top of the tab.
-
In the Input parameters popup that appears, perform the following actions:
-
In the Partition key value field, enter the value:
contosoairlines. -
Click the Add New Param button.
-
In the new field that appears, enter the value:
{ "company": "contosoairlines", "industry": "travel" }. -
Click the Execute button.
-
-
In the Result pane at the bottom of the tab, observe the results of the stored procedure’s execution.
You should see a new document in your collection. Azure Cosmos DB has assigned additional fields to the document such as
idand_etag. -
Click the New SQL Query button at the top of the Data Explorer section.
-
In the query tab, replace the contents of the query editor with the following SQL query:
SELECT * FROM investors WHERE investors.company = "contosoairlines" AND investors.industry = "travel"This query will retrieve the document you have just created.
-
Click the Execute Query button in the query tab to run the query.
-
In the Results pane, observe the results of your query.
-
Close the Query tab.
Create Stored Procedure with Logging
-
Click the New Stored Procedure button at the top of the Data Explorer section.
-
In the stored procedure tab, locate the Stored Procedure Id field and enter the value: createDocumentWithLogging.
-
Replace the contents of the stored procedure editor with the following JavaScript code:
 function createDocumentWithLogging(doc) {
     console.log("procedural-start ");
     var context = getContext();
     var collection = context.getCollection();
     console.log("metadata-retrieved ");
     var accepted = collection.createDocument(
         collection.getSelfLink(),
         doc,
         function (err, newDoc) {
             console.log("callback-started ");
             if (err) throw new Error('Error' + err.message);
             context.getResponse().setBody(newDoc.id);
         }
     );
     console.log("async-doc-creation-started ");
     if (!accepted) return;
     console.log("procedural-end");
 }
This stored procedure will use the console.log feature that’s normally used in browser-based JavaScript to write output to the console. In the context of Azure Cosmos DB, this feature can be used to capture diagnostics logging information that can be returned after the stored procedure is executed.
-
Click the Save button at the top of the tab.
-
Click the Execute button at the top of the tab.
-
In the Input parameters popup that appears, perform the following actions:
-
In the Partition key value field, enter the value:
contosoairlines. -
Click the Add New Param button.
-
In the new field that appears, enter the value:
{ "company": "contosoairlines" }. -
Click the Execute button.
-
-
In the Result pane at the bottom of the tab, observe the results of the stored procedure’s execution.
You should see the unique id of a new document in your collection.
-
Click the console.log link in the Result pane to view the log data for your stored procedure execution.
You can see that the procedural components of the stored procedure finished first and then the callback function was executed once the document was created. This can help you understand the asynchronous nature of JavaScript callbacks.
Create Stored Procedure with Callback Functions
-
Click the New Stored Procedure button at the top of the Data Explorer section.
-
In the stored procedure tab, locate the Stored Procedure Id field and enter the value: createDocumentWithFunction.
-
Replace the contents of the stored procedure editor with the following JavaScript code:
 function createDocumentWithFunction(document) {
     var context = getContext();
     var collection = context.getCollection();
     if (!collection.createDocument(collection.getSelfLink(), document, documentCreated))
         return;
     function documentCreated(error, newDocument) {
         if (error) throw new Error('Error' + error.message);
         context.getResponse().setBody(newDocument);
     }
 }
This is the same stored procedure as you created previously but it is using a named function instead of an implicit callback function inline.
-
Click the Save button at the top of the tab.
-
Click the Execute button at the top of the tab.
-
In the Input parameters popup that appears, perform the following actions:
-
In the Partition key value field, enter the value:
adventureworks. -
Click the Add New Param button.
-
In the new field that appears, enter the value:
{ "company": "contosoairlines" }. -
Click the Execute button.
-
-
In the Result pane at the bottom of the tab, observe that the stored procedure execution has failed.
Stored procedures are bound to a specific partition key. In this example, tried to execute the stored procedure within the context of the adventureworks partition key. Within the stored procedure, we tried to create a new document using the contosoairlines partition key. The stored procedure was unable to create a new document (or access existing documents) in a partition key other than the one specified when the stored procedure is executed. This caused the stored procedure to fail. You are not able to create or manipulate documents across partition keys within a stored procedure.
-
Click the Execute button at the top of the tab.
-
In the Input parameters popup that appears, perform the following actions:
-
In the Partition key value field, enter the value:
adventureworks. -
Click the Add New Param button.
-
In the new field that appears, enter the value:
{ "company": "adventureworks" }. -
Click the Execute button.
-
-
In the Result pane at the bottom of the tab, observe the results of the stored procedure’s execution.
You should see a new document in your collection. Azure Cosmos DB has assigned additional fields to the document such as
idand_etag. -
Click the New SQL Query button at the top of the Data Explorer section.
-
In the query tab, replace the contents of the query editor with the following SQL query:
SELECT * FROM investors WHERE investors.company = "adventureworks"This query will retrieve the document you have just created.
-
Click the Execute Query button in the query tab to run the query.
-
In the Results pane, observe the results of your query.
-
Close the Query tab.
Create Stored Procedure with Error Handling
-
Click the New Stored Procedure button at the top of the Data Explorer section.
-
In the stored procedure tab, locate the Stored Procedure Id field and enter the value: createTwoDocuments.
-
Replace the contents of the stored procedure editor with the following JavaScript code:
 function createTwoDocuments(companyName, industry, taxRate) {
     var context = getContext();
     var collection = context.getCollection();
     var firstDocument = {
         company: companyName,
         industry: industry
     };
     var secondDocument = {
         company: companyName,
         tax: {
             exempt: false,
             rate: taxRate
         }
     };
     var firstAccepted = collection.createDocument(collection.getSelfLink(), firstDocument,
         function (firstError, newFirstDocument) {
             if (firstError) throw new Error('Error' + firstError.message);
             var secondAccepted = collection.createDocument(collection.getSelfLink(), secondDocument,
                 function (secondError, newSecondDocument) {
                     if (secondError) throw new Error('Error' + secondError.message);
                     context.getResponse().setBody({
                         companyRecord: newFirstDocument,
                         taxRecord: newSecondDocument
                     });
                 }
             );
             if (!secondAccepted) return;
         }
     );
     if (!firstAccepted) return;
 }
This stored procedure uses nested callbacks to create two seperate documents. You may have scenarios where your data is split across multiple JSON documents and you will need to add or modify multiple documents in a single stored procedure.
-
Click the Save button at the top of the tab.
-
Click the Execute button at the top of the tab.
-
In the Input parameters popup that appears, perform the following actions:
-
In the Partition key value field, enter the value:
abcairways. -
Click the Add New Param button three times.
-
In the first field that appears, enter the value:
abcairways. -
In the second field that appears, enter the value:
travel. -
In the third field that appears, enter the value:
1.05. -
Click the Execute button.
-
-
In the Result pane at the bottom of the tab, observe the results of the stored procedure’s execution.
You should see a new document in your collection. Azure Cosmos DB has assigned additional fields to the document such as
idand_etag. -
Replace the contents of the stored procedure editor with the following JavaScript code:
 function createTwoDocuments(companyName, industry, taxRate) {
     var context = getContext();
     var collection = context.getCollection();
     var firstDocument = {
         company: companyName,
         industry: industry
     };
     var secondDocument = {
         company: companyName + "_taxprofile",
         tax: {
             exempt: false,
             rate: taxRate
         }
     };
     var firstAccepted = collection.createDocument(collection.getSelfLink(), firstDocument,
         function (firstError, newFirstDocument) {
             if (firstError) throw new Error('Error' + firstError.message);
             console.log('Created: ' + newFirstDocument.id);
             var secondAccepted = collection.createDocument(collection.getSelfLink(), secondDocument,
                 function (secondError, newSecondDocument) {
                     if (secondError) throw new Error('Error' + secondError.message);
                     console.log('Created: ' + newSecondDocument.id);
                     context.getResponse().setBody({
                         companyRecord: newFirstDocument,
                         taxRecord: newSecondDocument
                     });
                 }
             );
             if (!secondAccepted) return;
         }
     );
     if (!firstAccepted) return;
 }
Transactions are deeply and natively integrated into Cosmos DB’s JavaScript programming model. Inside a JavaScript function, all operations are automatically wrapped under a single transaction. If the JavaScript completes without any exception, the operations to the database are committed. We are going to change the stored procedure to put in a different company name for the second document. This should cause the stored procedure to fail since the second document uses a different partition key. If there is any exception that’s propagated from the script, Cosmos DB’s JavaScript runtime will roll back the whole transaction. This will effectively ensure that the first or second documents are not commited to the database.
-
Click the Update button at the top of the tab.
-
Click the Execute button at the top of the tab.
-
In the Input parameters popup that appears, perform the following actions:
-
In the Partition key value field, enter the value:
jetsonairways. -
Click the Add New Param button three times.
-
In the first field that appears, enter the value:
jetsonairways. -
In the second field that appears, enter the value:
travel. -
In the third field that appears, enter the value:
1.15. -
Click the Execute button.
-
-
In the Result pane at the bottom of the tab, observe that the stored procedure execution has failed.
This stored procedure failed to create the second document so the entire transaction was rolled back.
-
Click the New SQL Query button at the top of the Data Explorer section.
-
In the query tab, replace the contents of the query editor with the following SQL query:
SELECT * FROM investors WHERE investors.company = "jetsonairways"This query won’t retrieve any documents since the transaction was rolled back.
-
Click the Execute Query button in the query tab to run the query.
-
In the Results pane, observe the results of your query.
-
Close the Query tab.
Author Stored Procedures using the Continuation Model
You will now implement stored procedures that may execute longer than the bounded execution limits on the server. You will implement the continuation model so that the stored procedures can “pick up where they left off” after they ran out of time in a previous execution.
Create Bulk Upload and Bulk Delete Stored Procedures
-
Click the New Stored Procedure button at the top of the Data Explorer section.
-
In the stored procedure tab, locate the Stored Procedure Id field and enter the value: bulkUpload.
-
Replace the contents of the stored procedure editor with the following JavaScript code:
 function bulkUpload(docs) {
     var collection = getContext().getCollection();
     var collectionLink = collection.getSelfLink();
     var count = 0;
     if (!docs) throw new Error("The array is undefined or null.");
     var docsLength = docs.length;
     if (docsLength == 0) {
         getContext().getResponse().setBody(0);
         return;
     }
     tryCreate(docs[count], callback);
     function tryCreate(doc, callback) {
         var isAccepted = collection.createDocument(collectionLink, doc, callback);
         if (!isAccepted) getContext().getResponse().setBody(count);
     }
     function callback(err, doc, options) {
         if (err) throw err;
         count++;
         if (count >= docsLength) {
             getContext().getResponse().setBody(count);
         } else {
             tryCreate(docs[count], callback);
         }
     }
 }
This stored procedure uploads an array of documents in one batch. If the entire batch is not completed, the stored procedure will set the response body to the number of documents that were imported. Your client-side code is expected to call this stored procedure multiple times until all documents are imported.
If you are having trouble copying the stored procedure above, the full source code for this stored procedure is located here: bulk_upload.js
-
Click the Save button at the top of the tab.
-
Click the New Stored Procedure button at the top of the Data Explorer section.
-
In the stored procedure tab, locate the Stored Procedure Id field and enter the value: bulkDelete.
-
Replace the contents of the stored procedure editor with the following JavaScript code:
 function bulkDelete(query) {
     var collection = getContext().getCollection();
     var collectionLink = collection.getSelfLink();
     var response = getContext().getResponse();
     var responseBody = {
         deleted: 0,
         continuation: true
     };
     if (!query) throw new Error("The query is undefined or null.");
     tryQueryAndDelete();
     function tryQueryAndDelete(continuation) {
         var requestOptions = {continuation: continuation};
         var isAccepted = collection.queryDocuments(collectionLink, query, requestOptions, function (err, retrievedDocs, responseOptions) {
             if (err) throw err;
             if (retrievedDocs.length > 0) {
                 tryDelete(retrievedDocs);
             } else if (responseOptions.continuation) {
                 tryQueryAndDelete(responseOptions.continuation);
             } else {
                 responseBody.continuation = false;
                 response.setBody(responseBody);
             }
         });
         if (!isAccepted) {
             response.setBody(responseBody);
         }
     }
     function tryDelete(documents) {
         if (documents.length > 0) {
             var isAccepted = collection.deleteDocument(documents[0]._self, {}, function (err, responseOptions) {
                 if (err) throw err;
                 responseBody.deleted++;
                 documents.shift();
                 tryDelete(documents);
             });
             if (!isAccepted) {
                 response.setBody(responseBody);
             }
         } else {
             tryQueryAndDelete();
         }
     }
 }
This stored procedure iterates through all documents that match a specific query and deletes the documents. If the stored procedure is unable to delete all documents, it will return a continuation token. Your client-side code is expected to repeatedly call the stored procedure passing in a continuation token until the stored procedure does not return a continuation token.
If you are having trouble copying the stored procedure above, the full source code for this stored procedure is located here: bulk_delete.js
-
Click the Save button at the top of the tab.
Create a Java Project
-
On your local machine, create a new folder that will be used to contain the content of your Java project.
-
In the new folder, right-click the folder and select the Open with Code menu option.
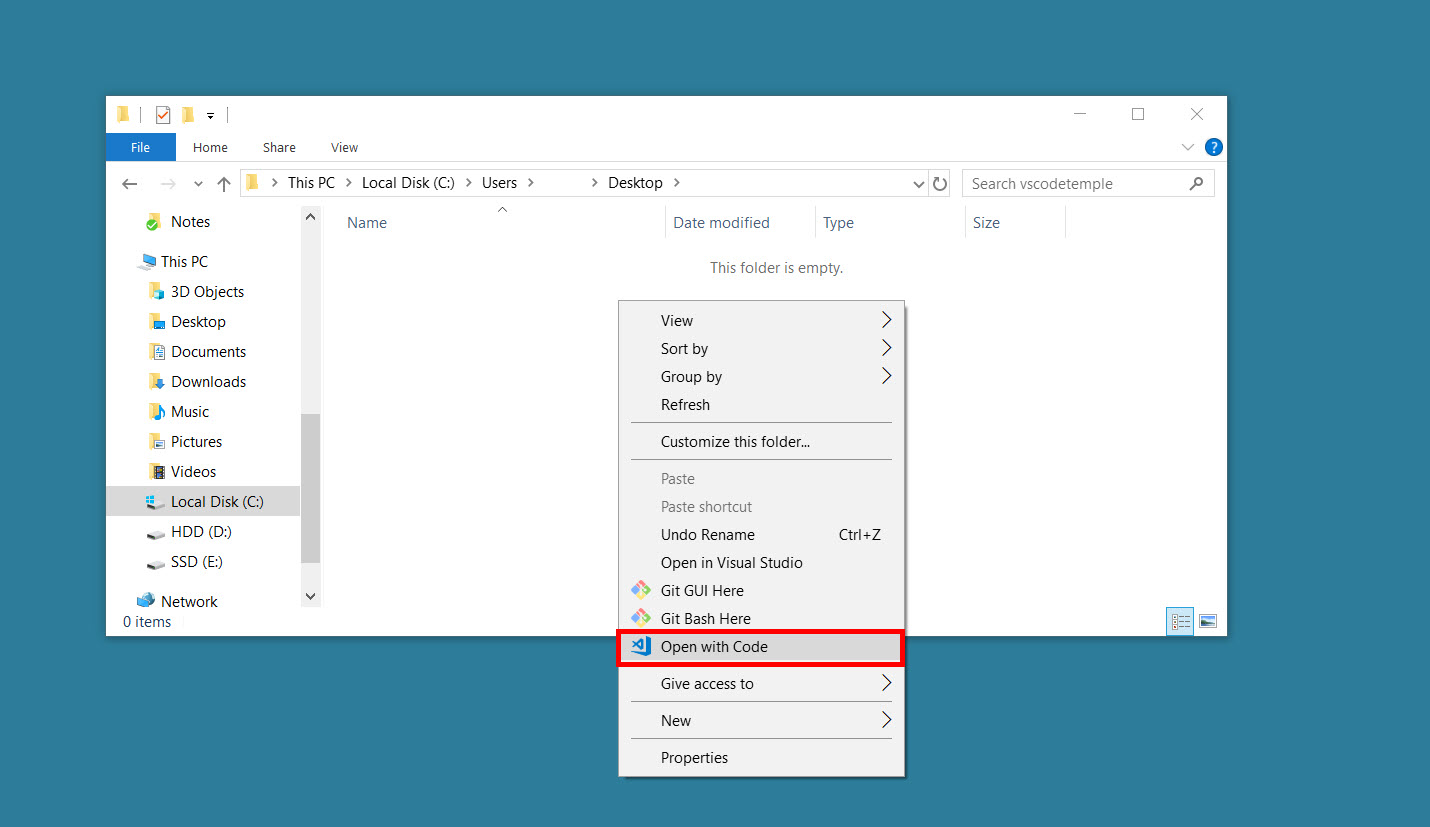
Alternatively, you can run a command prompt in your current directory and execute the
code .command. -
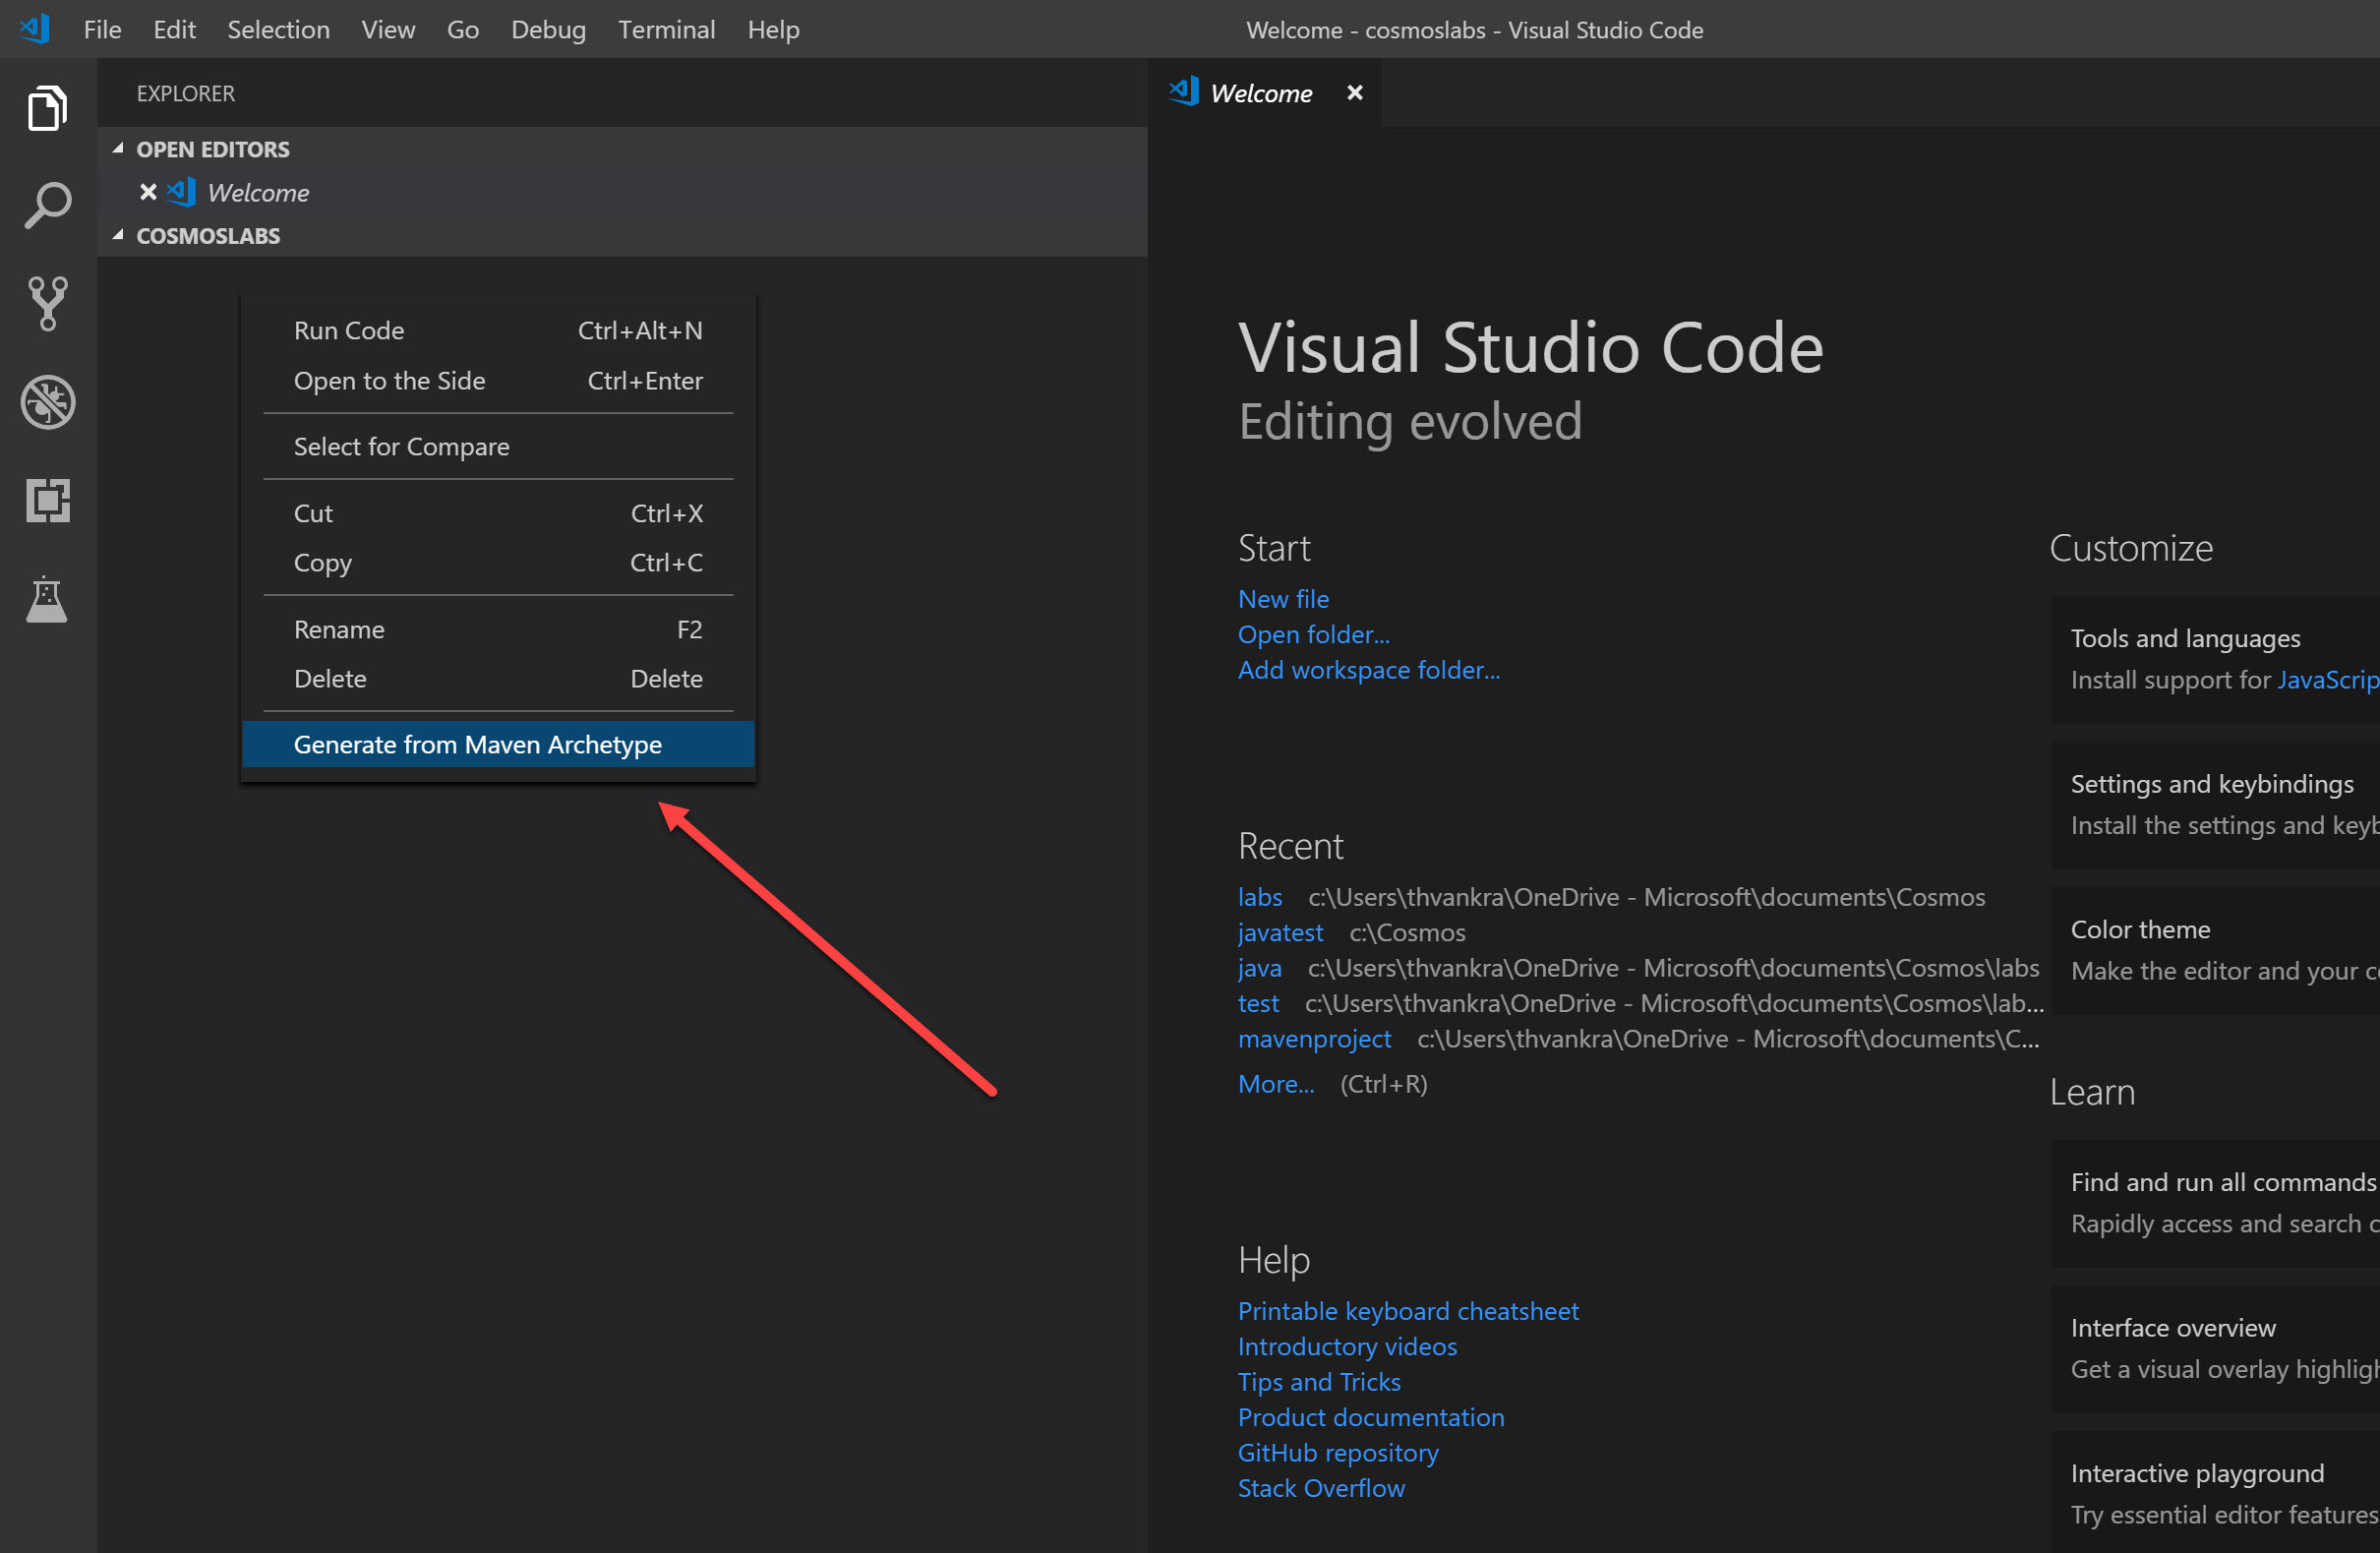
In the Visual Studio Code window that appears, right-click the Explorer under the folder you created, and select “Generate from Maven Archetype”:
-
From the options that appear, select “maven-archetype-quickstart”, and then select the directory you created for the project when prompted. Maven will then prompt you to provide values for group id, artifact id, version, package. Fill these in when prompted and then confirm:

-
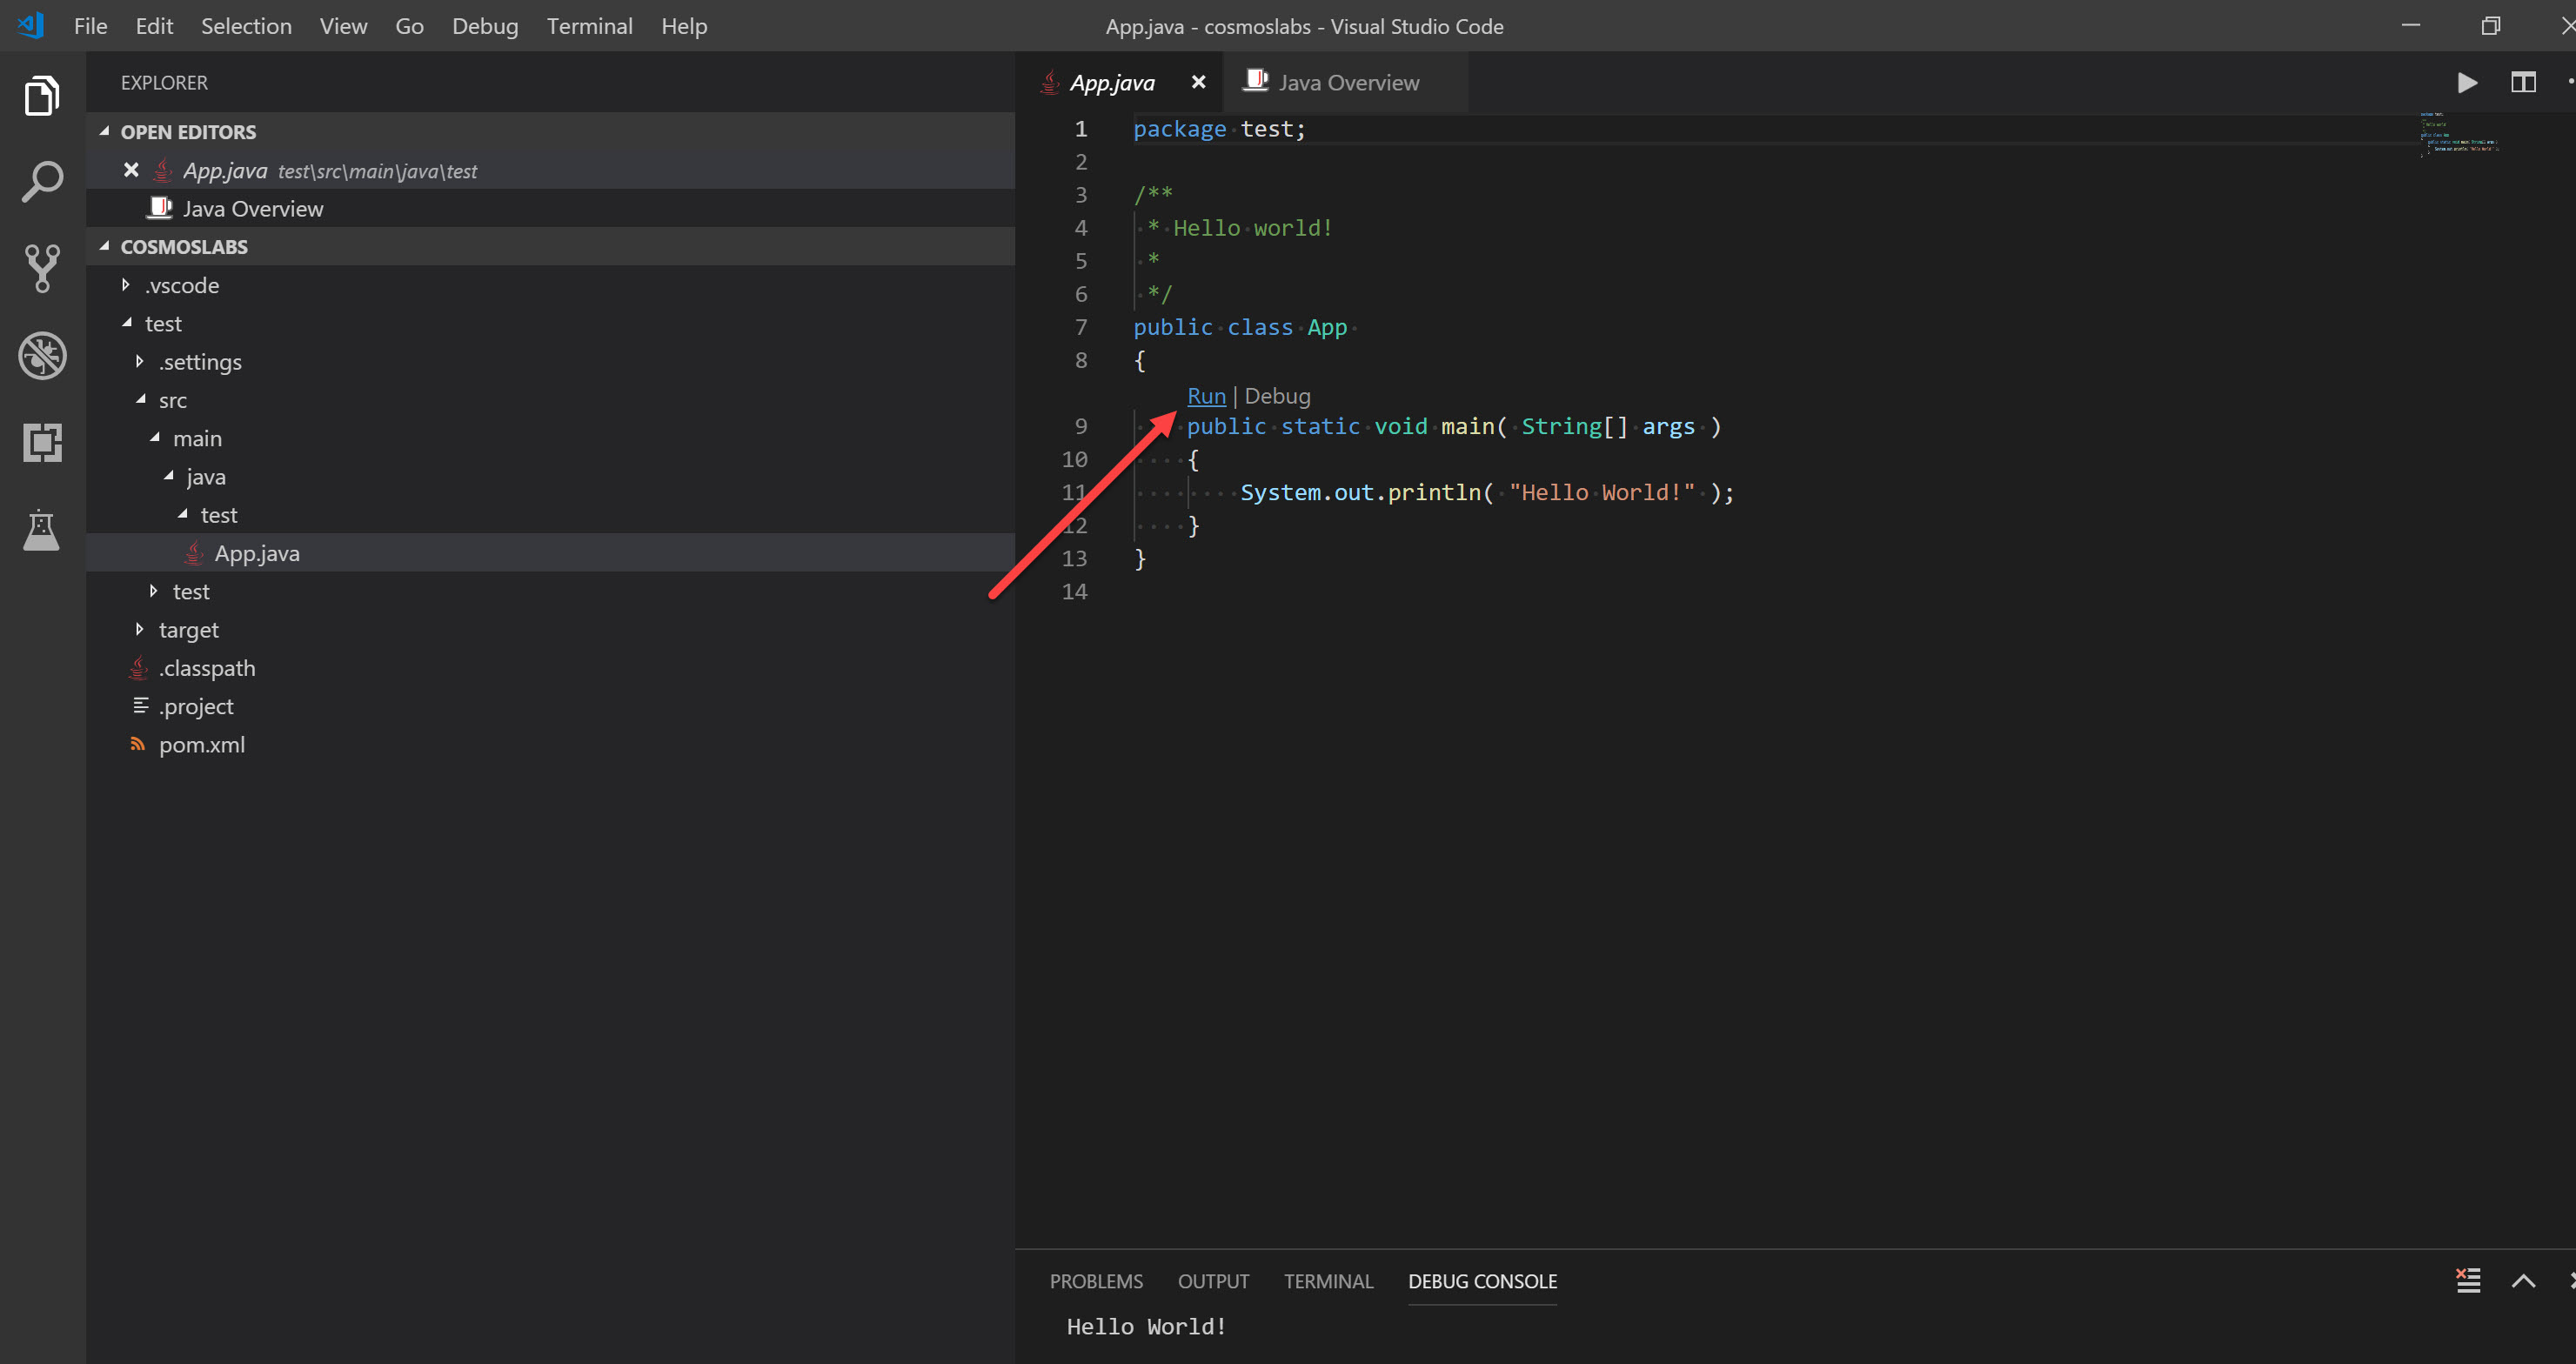
Once confirmed, Maven will create the project, and provide a sample App.java. For any Java class created in the project, VS Code’s Java Extension will provide “run” and “debug” links directly in the code. Clicking “run” will compile and run your Java code:
-
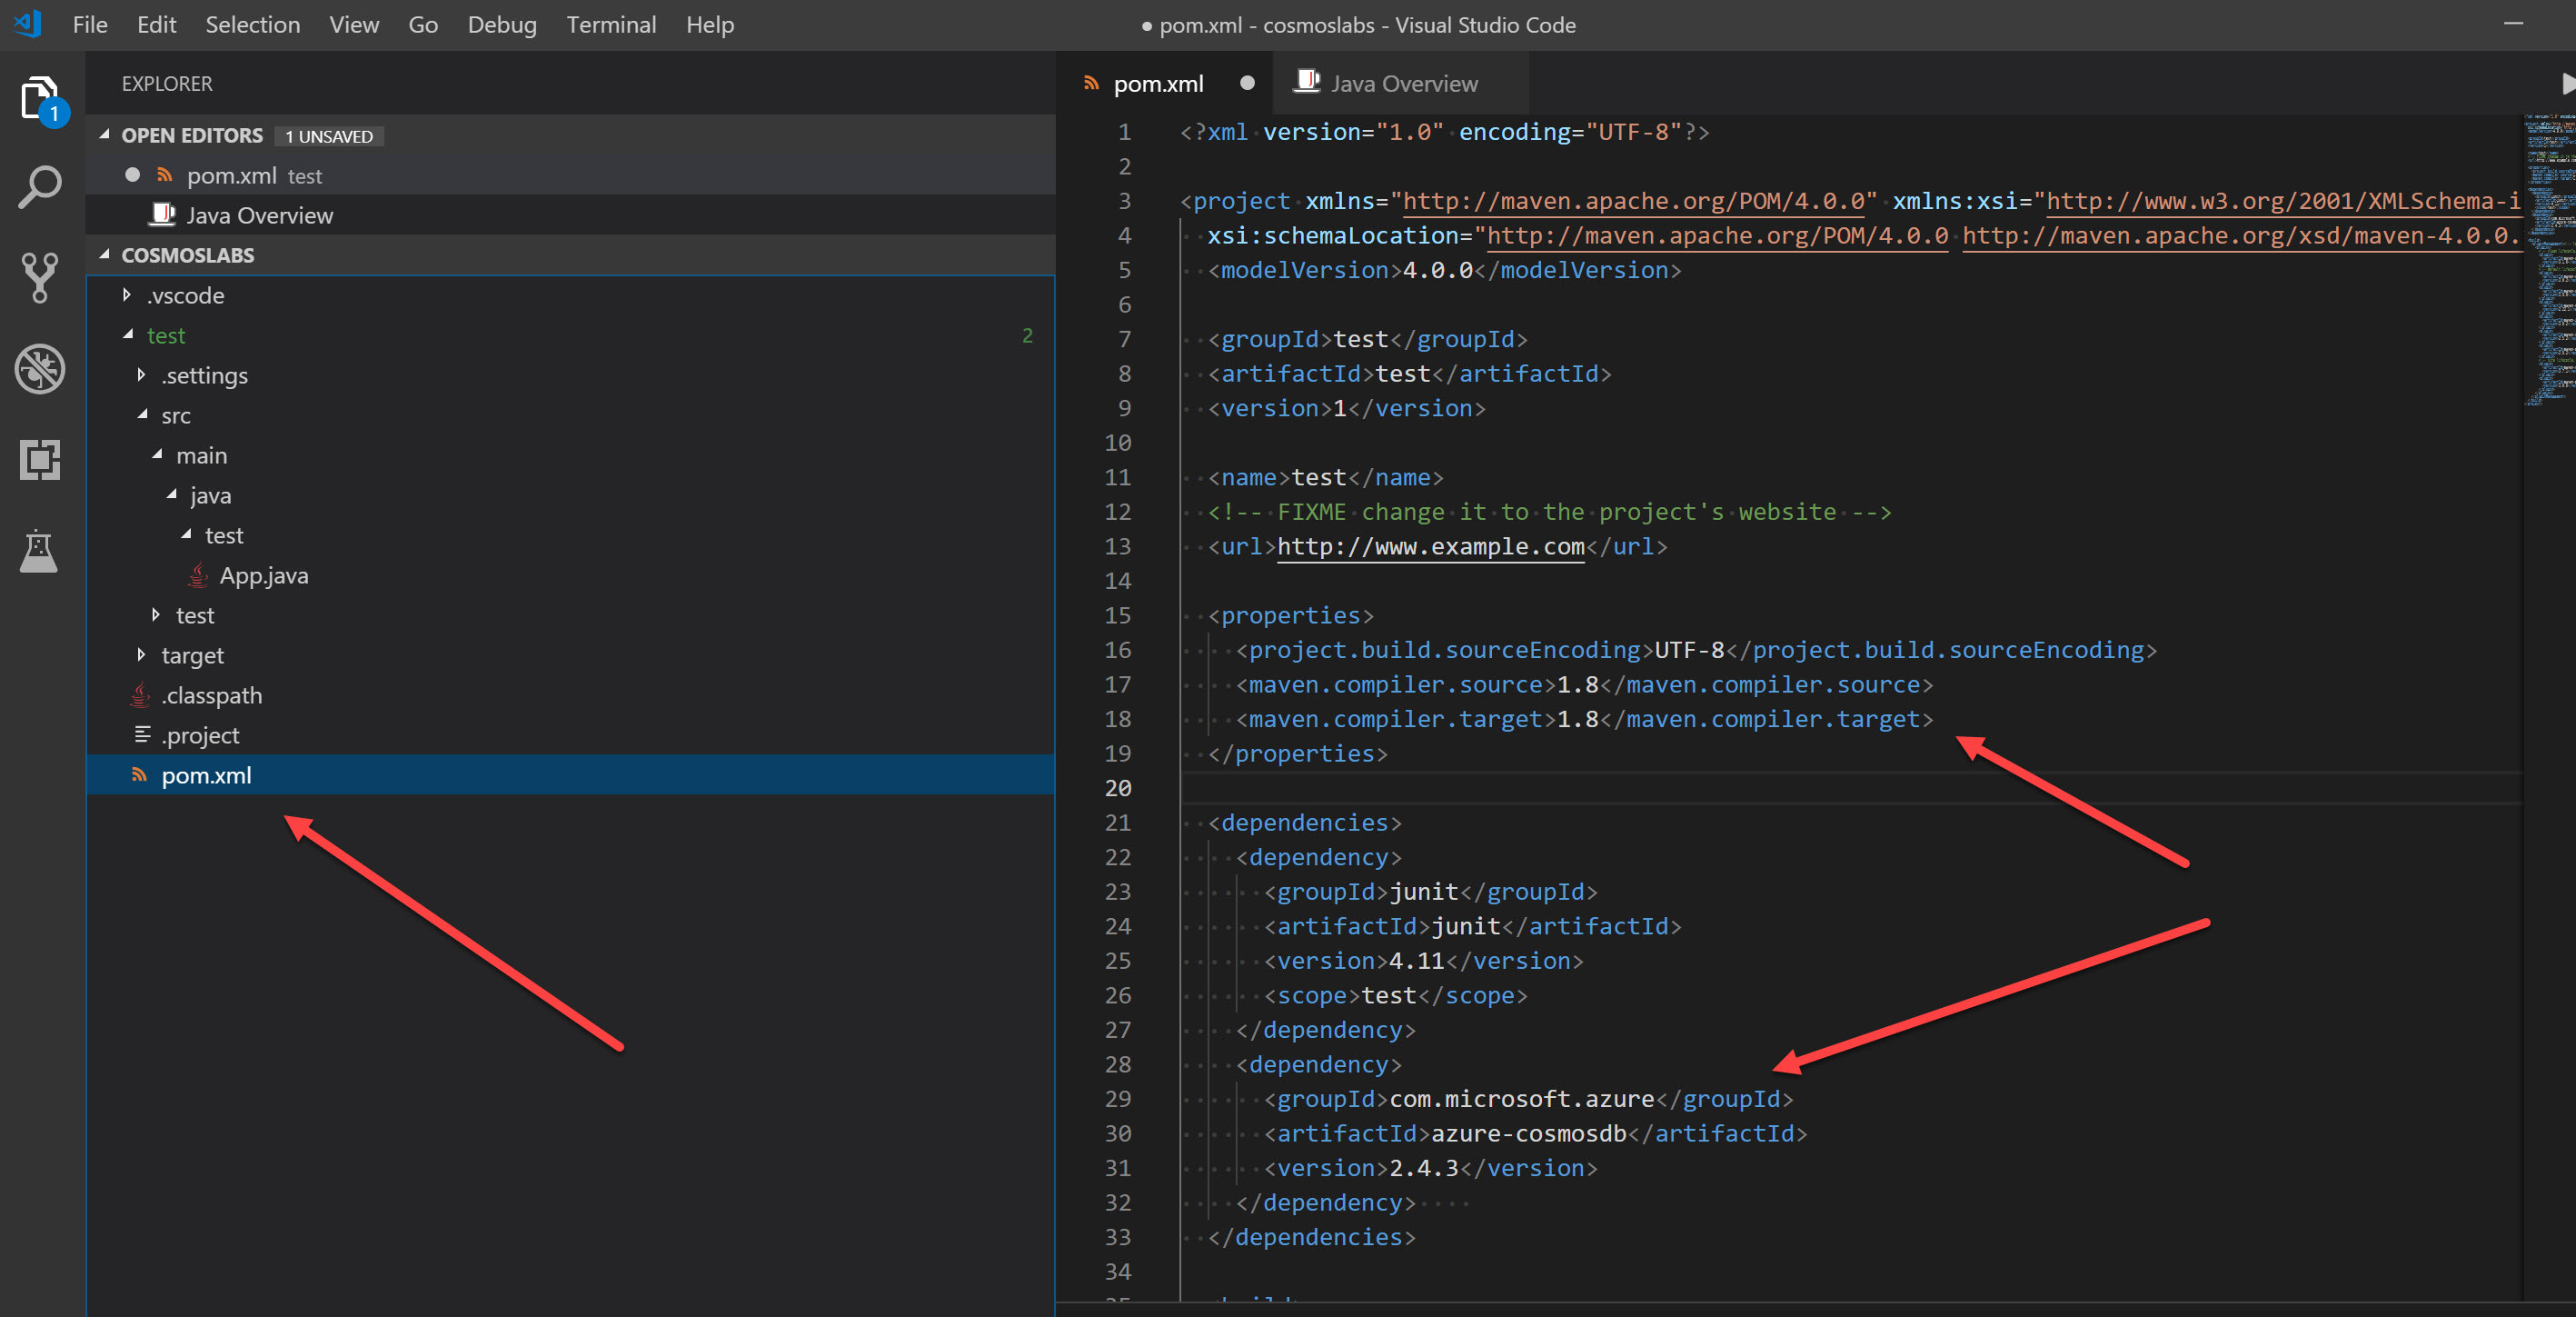
To add the Maven project dependancies required to work with Cosmos DB, you should add the following into the pom.xml file located at the bottom of your project, within the dependancies section:
<dependency> <groupId>com.microsoft.azure</groupId> <artifactId>azure-cosmosdb</artifactId> <version>2.4.3</version> </dependency> -
For this tutorial, you will also need to change the source and target compiler versions to Java 1.8, as we will use some lambda syntax which is only supported from Java 8 onwards. When finished, your pom.xml should look like the below:
-
Once the changes are applied, ensure you click file -> save all. At this point, VS Code will recognise that you modified the pom.xml build file. Ensure that you accept the prompt to sync the dependancies:

Once the dependencies are pulled down, you will be ready to start writing Java code for Cosmos DB.
Create AsyncDocumentClient Instance and Database
The AsyncDocumentClient class is the main “entry point” to using the SQL API in Azure Cosmos DB. We are going to create an instance of the AsyncDocumentClient class by passing in connection metadata as parameters of the class’ constructor. We will then use this class instance throughout the lab.
- To help generate random data in the documents, we are going to use a java library called “javafaker”, which was also used in an earlier lab. If not already done so, you will need to add the following to your pom.xml file, located at the bottom of your project, within the dependancies section (ensure you accept the “synchronize the Java classpath/configuration” warning if you have not accepted this permanently):
     <dependency>
         <groupId>com.github.javafaker</groupId>
         <artifactId>javafaker</artifactId>
         <version>0.17.2</version>
     </dependency>
-
At the same level as the default “App.java” file that already exists, right click and create a new file called “Person.java” . The editor will automatically open this file. Copy in the following code (be sure that the package declaration matches the classpath you have created in the above steps):
package test; import java.text.DecimalFormat; import java.util.ArrayList; import java.util.Random; import com.github.javafaker.Faker; import com.microsoft.azure.cosmosdb.Document; public class Person { Faker faker = new Faker(); ArrayList<Object> documentDefinitions = new ArrayList<>(); public Person(int number) throws NumberFormatException { for (int i= 0; i < number;i++){ Document documentDefinition = new Document(); documentDefinition.set("firstName", faker.name().firstName()); documentDefinition.set("lastName", faker.name().lastName()); documentDefinition.set("company", "contosofinancial"); String docdef = documentDefinition.toString(); documentDefinitions.add(docdef); } } } -
Create a new file called “Program.java” (or delete the contents of the existing file if already created)
-
Within the Program.java editor tab, Add the package declaration (which will need to match the path you created for your maven project, if not “test” as in the sample shown here) and the following imports to the top of the editor:
package test; import java.util.ArrayList; import java.util.concurrent.CountDownLatch; import java.util.concurrent.ExecutorService; import java.util.concurrent.Executors; import com.microsoft.azure.cosmosdb.ConnectionPolicy; import com.microsoft.azure.cosmosdb.ConsistencyLevel; import com.microsoft.azure.cosmosdb.DocumentCollection; import com.microsoft.azure.cosmosdb.PartitionKey; import com.microsoft.azure.cosmosdb.RequestOptions; import com.microsoft.azure.cosmosdb.rx.AsyncDocumentClient; import rx.Scheduler; import rx.schedulers.Schedulers; import com.microsoft.azure.cosmosdb.ConnectionMode; import com.microsoft.azure.cosmosdb.Document; import java.util.UUID; -
Create a Program class in the Program.java file as below, with the following class variables, a public constructor and main method:
public class Program { public Program() { //public constructor } public static void main( String[] args ) { } } -
Within the Program class, add the following lines of code to create variables for your connection information:
private final ExecutorService executorService; private final Scheduler scheduler; private AsyncDocumentClient client; private final String databaseName = "FinancialDatabase"; private final String collectionId = "InvestorCollection"; -
Locate the Program class constructor:
public Program() { //public constructor } -
Within the constructor, add the following lines of code (replacing “uri” and “key” with the values from your cosmos db account):
     public Program() {
         //public constructor
         executorService = Executors.newFixedThreadPool(100);
         scheduler = Schedulers.from(executorService);
         client = new AsyncDocumentClient.Builder().withServiceEndpoint("uri")
         .withMasterKeyOrResourceToken("key")
         .withConnectionPolicy(ConnectionPolicy.GetDefault()).withConsistencyLevel(ConsistencyLevel.Eventual)
         .build();
     }
We are now going to implement a stored procedure.
Execute Bulk Upload Stored Procedure from Async Java SDK
-
Below the Main method, add the following method to execute the bulkUpload stored procedure:
public void executeStoredProc() throws Exception { System.out.println("creating documents"); ArrayList<Object> documents = new Person(500).documentDefinitions; RequestOptions requestOptions = new RequestOptions(); requestOptions.setScriptLoggingEnabled(true); requestOptions.setPartitionKey(new PartitionKey("contosofinancial")); final CountDownLatch successfulCompletionLatch = new CountDownLatch(1); String sprocLink = "dbs/" + databaseName + "/colls/" + collectionId + "/sprocs/bulkUpload"; // Execute the stored procedure Object docs = documents.toArray(); Object[] storedProcedureArgs = new Object[]{docs}; client.executeStoredProcedure(sprocLink, requestOptions, storedProcedureArgs) .subscribe(storedProcedureResponse -> { String storedProcResultAsString = storedProcedureResponse.getResponseAsString(); successfulCompletionLatch.countDown(); System.out.println(storedProcedureResponse.getActivityId()); }, error -> { System.err.println("an error occurred while executing the stored procedure: actual cause: " + error.getMessage()); }); successfulCompletionLatch.await(); } -
Locate the Main method:
public static void main( String[] args ) { } -
Within the Main method, add the following code:
Program p = new Program(); try { p.executeStoredProc(); System.out.println("finished"); } catch (Exception e) { System.err.println(String.format("failed with %s", e)); } System.exit(0); -
Your
Programclass definition should now look like this:public class Program { private final ExecutorService executorService; private final Scheduler scheduler; private AsyncDocumentClient client; private final String databaseName = "FinancialDatabase"; private final String collectionId = "InvestorCollection"; public Program() { executorService = Executors.newFixedThreadPool(100); scheduler = Schedulers.from(executorService); // Sets up the requirements for each test ConnectionPolicy connectionPolicy = new ConnectionPolicy(); connectionPolicy.setConnectionMode(ConnectionMode.Direct); client = new AsyncDocumentClient.Builder() .withServiceEndpoint("uri") .withMasterKeyOrResourceToken("key") .withConnectionPolicy(connectionPolicy) .withConsistencyLevel(ConsistencyLevel.Session) .build(); DocumentCollection collectionDefinition = new DocumentCollection(); collectionDefinition.setId(UUID.randomUUID().toString()); } /** * Create a document with a programmatically set definition, in an Async manner */ public static void main(String[] args) { SPProgram p = new Program(); try { p.executeStoredProc(); System.out.println("finished"); } catch (Exception e) { System.err.println(String.format("failed with %s", e)); } System.exit(0); } public void executeStoredProc() throws Exception { System.out.println("creating documents"); ArrayList<Object> documents = new Person(500).documentDefinitions; RequestOptions requestOptions = new RequestOptions(); requestOptions.setScriptLoggingEnabled(true); requestOptions.setPartitionKey(new PartitionKey("contosofinancial")); final CountDownLatch successfulCompletionLatch = new CountDownLatch(1); String sprocLink = "dbs/" + databaseName + "/colls/" + collectionId + "/sprocs/bulkUpload"; // Execute the stored procedure Object docs = documents.toArray(); Object[] storedProcedureArgs = new Object[]{docs}; client.executeStoredProcedure(sprocLink, requestOptions, storedProcedureArgs) .subscribe(storedProcedureResponse -> { String storedProcResultAsString = storedProcedureResponse.getResponseAsString(); successfulCompletionLatch.countDown(); System.out.println(storedProcedureResponse.getActivityId()); }, error -> { System.err.println("an error occurred while executing the stored procedure: actual cause: " + error.getMessage()); }); successfulCompletionLatch.await(); } } -
Save all of your open editor tabs, and click run.
-
Observe the results of the console project.
This stored procedure will bulk upload 500 documents to your collection within the specified partition key.
-
Click the 🗙 symbol to close the terminal pane.
Observe the Uploaded Documents in the Azure Portal
-
Return to the Azure Portal (http://portal.azure.com).
-
On the left side of the portal, click the Resource groups link.
-
In the Resource groups blade, locate and select the cosmosgroup-lab Resource Group.
-
In the cosmosgroup-lab blade, select the Azure Cosmos DB account you recently created.
-
In the Azure Cosmos DB blade, locate and click the Data Explorer link on the left side of the blade.
-
In the Data Explorer section, expand the FinancialDatabase database node and then observe select the InvestorCollection node.
-
Click the New SQL Query button at the top of the Data Explorer section.
-
In the query tab, replace the contents of the query editor with the following SQL query:
SELECT * FROM investors i WHERE i.company = "contosofinancial"To validate that our documents were uploaded, we will issue a query to select all documents with the partition key we used earlier for the stored procedure’s execution.
-
Click the Execute Query button in the query tab to run the query.
-
In the Results pane, observe the results of your query.
-
In the query tab, replace the contents of the query editor with the following SQL query:
SELECT COUNT(1) FROM investors i WHERE i.company = "contosofinancial"This query will return a count of the documents that are in the contosofinancial partition key.
-
Click the Execute Query button in the query tab to run the query.
-
In the Results pane, observe the results of your query.
Execute Bulk Delete Stored Procedure from Java Async SDK
-
Double-click the Program.java link in the Explorer pane to open the file in the editor.
-
Locate the executeStoredProc method and delete any existing code:
public void executeStoredProc() throws Exception { { } -
Replace the executeStoredProc method with the following:
 public void executeStoredProc() throws Exception {

     System.out.println("deleting documents");
     RequestOptions requestOptions = new RequestOptions();
     requestOptions.setScriptLoggingEnabled(true);
     requestOptions.setPartitionKey(new PartitionKey("contosofinancial"));

     final CountDownLatch successfulCompletionLatch = new CountDownLatch(1);
     String sprocLink = "dbs/" + databaseName + "/colls/" + collectionId + "/sprocs/bulkDelete";

     String query = "SELECT * FROM investors i WHERE i.company = 'contosofinancial'";
     // Execute the stored procedure

     Object[] storedProcedureArgs = new Object[]{query};
     client.executeStoredProcedure(sprocLink, requestOptions, storedProcedureArgs)
             .subscribe(storedProcedureResponse -> {
                 String storedProcResultAsString = storedProcedureResponse.getResponseAsString();
                 successfulCompletionLatch.countDown();
                 System.out.println(storedProcedureResponse.getActivityId());
             }, error -> {
                 System.err.println("an error occurred while executing the stored procedure: actual cause: "
                                            + error.getMessage());
             });

     successfulCompletionLatch.await();

 }
This code will execute the stored procedure that deletes documents.
-
Save all of your open editor tabs, and click run.
-
Observe the results of the console project.
This stored procedure will delete all of the documents associated with the specified partition key. In this demo, this means we will delete the documents we batch uploaded earlier.
-
Click the 🗙 symbol to close the terminal pane.
-
Close all open editor tabs.
-
Close the Visual Studio Code application.
Query for Documents Within a Partition Key in the Azure Portal
-
Return to the Azure Portal (http://portal.azure.com).
-
On the left side of the portal, click the Resource groups link.
-
In the Resource groups blade, locate and select the cosmosgroup-lab Resource Group.
-
In the cosmosgroup-lab blade, select the Azure Cosmos DB account you recently created.
-
In the Azure Cosmos DB blade, locate and click the Data Explorer link on the left side of the blade.
-
In the Data Explorer section, expand the FinancialDatabase database node and then observe select the InvestorCollection node.
-
Click the New SQL Query button at the top of the Data Explorer section.
-
In the query tab, replace the contents of the query editor with the following SQL query:
SELECT COUNT(1) FROM investors i WHERE i.company = "contosofinancial"This query will return a count of the documents that are in the contosofinancial partition key. This count should verify that all documents were deleted.
-
Click the Execute Query button in the query tab to run the query.
-
In the Results pane, observe the results of your query.
-
Close your browser application.